
The Elastic Stack (ELK) is an amazing index-searching tool, utilizing services such as Elasticsearch, Logstash, and Kibana to index and store logs and Beats Data Shippers such as Winlogbeat to ship them there. However, ELK can be just as scary, storing data from a plethora of different machines across one or more networks ripe for a potential attacker to obtain. A malicious actor could use techniques such as a Man-In-The-Middle attack to intercept traffic between an endpoint and Logstash, thus obtaining data that only those with credentials to that specific endpoint would have had access to.
A possible solution could be to fortify your firewall – establishing rules to only allow each service to communicate between essential nodes (i.e. Elasticsearch nodes free to talk to each other while only allowing outside queries from Kibana and the filtered data from Logstash). This could work to increase security, but if an attacker intercepts this traffic by IP Spoofing, you’re toast. Luckily, Logstash and Beats both support SSL encryption, and the guide below will walk you through the setup.
What you need
- A working Single or Multi-Node ELK Cluster
-
- Ubuntu or CentOS based (Ubuntu 18.04.1 used for this guide)
- CA Server (OPTIONAL – recommended for Enterprise environments, however not used in this guide)
- OpenSSL (v1.1.0g used in this guide)
Install OpenSSL on Logstash Node
Run the following command to see if OpenSSL is currently installed on your Logstash Node. If present, your output should look similar to the following:

If so, congrats. If not, yikes. Use apt-get install or yum install to grab OpenSSL. If installed and the version is OLDER than the one I am using above, update to my version to ensure compatibility.
NOTE: OpenSSL is always updating due to the ongoing vulnerabilities it faces. It SHOULD be okay to update to a version newer than the one I am using, taking into consideration there may already be a new version as I sit drafting this post up. Use whatever version you want at your own discretion with an understanding some of the commands seen in the rest of this post may be subject to change. LibreSSL is also a valid option; a fork of OpenSSL built on the basis of improved security.
Generate SSL Certificates
Stop the Logstash service on your node:
systemctl stop logstashNow we need to generate an SSL certificate and key pair for communication. This certificate is used by Beats to verify the identity of your Logstash server.
There are two methods to pull this off; utilizing DNS to resolve your Logstash node’s IP address, or manually pre-configuring it. To make things simple, we are going to manually add Logstash’s IP address to the certificate we generate.
Elevate to root privileges and open the OpenSSL configuration file:
sudo su
nano /etc/ssl/openssl.cnfNOTE: Ubuntu should be /etc/ssl OR /usr/lib/ssl, while CentOS should be /etc/pki/tls. Both directories in Ubuntu should be linked, meaning changes in each should reflect to the other. The reason for the difference in directories between the operating systems is unknown to me.
Find the section labeled [ v3_ca ] within the configuration file and add the following line, changing out my IP for the IP of your Logstash node:

Also find the [CA_default] section and change the “dir” variable to the directory you are working from (i.e. /etc/ssl), just to avoid any possible conflicts down the road:

Save the configuration file and exit.
Use the following command to generate the SSL certificate and private key and place them in the appropriate directories (make the /private directory if not present in your working directory):
cd /etc/ssl
mkdir private

sudo openssl req -config /etc/ssl/openssl.cnf -x509 -days 3650 -batch -nodes -newkey rsa:2048 -keyout private/logstash-forwarder.key -out certs/logstash-forwarder.crtNOTE: Change the number following -days to match the length of time you want your certificate to be valid. I chose 3650 days for testing purposes, but a much smaller number (like a year) would be more secure.
The certificate you just created, logstash-forwarder.crt, is what will be deployed to all endpoints you wish to have communication with Logstash to send logs.
OPTIONAL: To ensure Logstash can always contact your private key, you may want to modify the permissions on the /private directory and its contents so Logstash is the owner:
chown -R logstash:logstash private
chmod 700 -R private
Configure Logstash for SSL
Now that you have your private key and self-signed certificate, you need to configure Logstash to take and use these for all communications, which for this service is, by default, port 5044.
Edit the configuration file that you use in your pipeline to listen and ingest logs to Logstash. This is commonly referred to as the beats input configuration. The default location for these files is /etc/logstash/conf.d, but I got fancy and made mine /etc/logstash/pipeline to more closely resemble the purpose of the directory. I also use modified versions of the configuration files found on @Cyb3rWard0g’s GitHub page for HELK (Hunting ELK), which I highly recommend you check out. For myself, this file is named 0004-beats-input.conf.
Your beats input file’s SSL fields should match mine below:
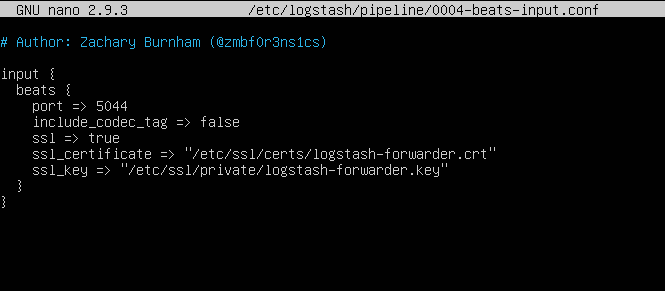
All other Logstash configuration files should be fine.
Configure Winlogbeat for SSL
Use whatever means at your disposal to copy logstash-forwarder.crt to your endpoints. Once copied, move it to a newly created folder (/ssl) in the directory where you keep winlogbeat:

Modify the winlogbeat.yml within your winlogbeat directory and add the following lines to your Logstash configuration section:

Ensure the path is the same as the path your certificate was placed in
Save and exit the configuration file and restart Winlogbeat as a service. On a Windows system, this can be done by going into the Services application and restarting it from there.
Test SSL Installation
Go back to your Logstash node and start up the service again. It may take 2-3 minutes for Logstash to come back up, but you can monitor it’s progress by looking at its logs with the following command:
tail -f /var/log/logstash/logstash-plain.logNavigate to Kibana and look for logs. If you see entries in the last 15 minutes, then you know you did something right:

To triple verify, run Wireshark on your SSL-configured endpoint for about 5-10 seconds and filter for traffic to your Logstash node’s IP address. If you see TLS traffic, you’re all set.

All Set!
You have successfully configured Logstash for SSL encrypted traffic between your endpoints. As always, leave a comment or question below if I missed something, or contact me 🙂

Amazing stuff, thanks for the great content..
LikeLike
Hey Zachary, another question on this: suppose i only expose logstash to my client network and use SSL like you describe, and i have elasticsearch /kibana on a seperate secure network that is not accessible by my clients, would that be “enough” security? It would mean my clients can only talk to logstash and all the juicy stuff like the rest api will not be accessible for them. Is this correct? Thanks agaian.
LikeLike
Jelle, as long as all of your nodes (ES, LS, KB) can talk to one another and effectively communicate/function, this should be correct – and way more secure than my current cluster! Network segmentation, in my opinion, is never a bad option. I have always seen Logstash as a sort of DMZ, where it is the most frontward facing while the others can be behind more security. If you end up being successful, I’d love to hear how you did it.
LikeLike
I only just saw your reply, thanks a lot mate! Yes, this is the way i will implement it at my work in the coming months (different VLANs), i would be happy to share the details with you, will do that via email once i have made a writeup. Because of your great articles i will be up and running with a multi-node ELK stack + sysmon + beats (SIEM solution) soon. One of the things i look forward to is implementing something like this: https://github.com/coolacid/logstash-filter-virustotal – this is a way to collect file hashes of all my clients in my network and then check those hashes against the virus-total API database to check for malicious files. It means we suddenly have the power of the analysis engines of many security products (and not just the ones we use as virus/malware software). Pretty cool stuff, and free! I will keep you posted Zachary, thanks again 🙂
LikeLiked by 1 person
can u show more detail on how you get windowlogbeat certificate for windows?
LikeLike